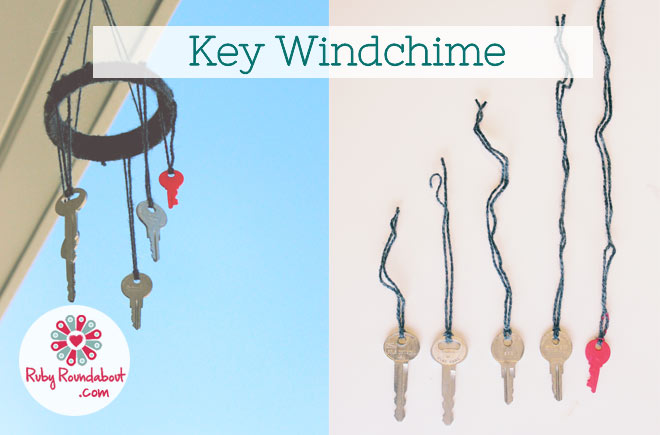
Make your own Wind Chime
While clearing out a junk drawer you might find a few old keys that are no longer useful, and if this is the case then you can make a beautiful, simple craft with them. The key wind chime can quickly and easily be made from a handful of objects you may have around the house. With some patience and a bit of creativity you can finish this craft and hang it outside to chime on the breeze.
Supplies
A few old keys
Nail polish
Yarn
Ring from a canning jar
Ring from a key chain

Step 1. Prepare your work space by laying down some newspaper. When working with nail polish you want to be especially careful that you do not spill on the table or your clothes. Using the nail polish in colors of your choice paint each of the keys on one side, let them dry, and then paint the other side. This might take a couple of coats. I have five keys here and you use three to ten, depending on how many you have. Just don’t choose any keys that are still needed.

Step 2. Next, using the yarn, you will string each of the keys at varying lengths. You do this by folding the yarn in half, pushing the loop through the keyhole, and then pulling the ends of the string through the loop of yarn. Pull it tight and string the next key. Once they are all strung you can put them in order and cut the yarn to varying lengths as shown.

Step 3. Warp yarn around the ring from the canning jar. All you have to do is tie one end in a double knot and then just start wrapping. After a little ways you will want to tie on a key. Just use another double knot to secure the yarn with the key and then continue to wrap with the yarn from the ring. Keep wrapping and spacing out your keys until the ring is completely covered.


Step 4. With the main part of your key wind chime completed it is time to add the hook. Cut two long pieces of yarn and fold them in half, and lay them on the table. Then place the key ring just above it on the table. Thread the yarn through the ring and then thread the ends of the yarn through the loop of yarn and pull tight.

Step 5. You should have four loose pieces of yarn hanging from the key ring. These you will secure, equally spaced, to the larger jar ring with double knots. If you don’t space them evenly then your key wind chime will hang crooked. This might take a little tweaking and a couple of tries, but you can do it. Once tied you can trim any extra yarn and go hang your key wind chime.

Personalise the Craft
As mentioned, you can use any colors of nail polish you like to personalise your own key wind chime. You can also use ribbon or twine instead of the yarn to string your keys and wrap the jar ring. It would be tricky, but if you want your key wind chime to hold up outside, you can even use fishing line to hang your keys. Once hung your hand crafted wind chime will catch the breeze and clink pleasantly when the keys knock together. It would be fun to hang in the back yard from a tree branch, or even from a hook on the front patio.
Recommended
-
Glue Salt and Food Colouring ArtMay 13th, 2014
-
Wood Bead KeychainMay 6th, 2014
-
Junk Mail EnvelopesApril 29th, 2014
-
Envelope BookApril 1st, 2014
-
Painted Pickup SticksMarch 24th, 2014


